Defrost Timer Simplified: Understanding the Black Wire Connection
Key Takeaways
- The black wire on a defrost timer is critical for the proper functioning of a refrigerator’s defrost system, supplying power to initiate the defrost cycle which helps prevent ice buildup and maintains the appliance’s efficiency. This wire typically requires a voltage supply between 24 and 120 volts AC or DC and should be correctly installed to avoid issues such as short circuits.
- Understanding the role and connection of the black wire is crucial for troubleshooting and maintenance. It connects to terminal #2 of the compressor, regulating the switch between cooling and defrosting modes. Mismanagement or improper installation of this wire can lead to significant malfunctions, potentially compromising food safety and appliance efficiency.
- Regular inspection and maintenance of the defrost timer and its connections, including the black wire, are essential for the longevity and performance of your refrigerator. Troubleshooting problems with the black wire involves checking for proper installation, using a voltmeter for continuity tests, and replacing faulty wires with caution, ensuring all safety measures are observed to prevent electric shock or appliance damage.
From the seemingly mundane task of Defrost Timer Black Wire to the mysteriousness of what lies beneath the black wire, this is your opportunity to get an inside look into how a refrigerator’s defrost timer works.
Take a deep dive into the mechanics and discover why connecting power to that black wire can help you keep food safe and properly frozen in your own home.
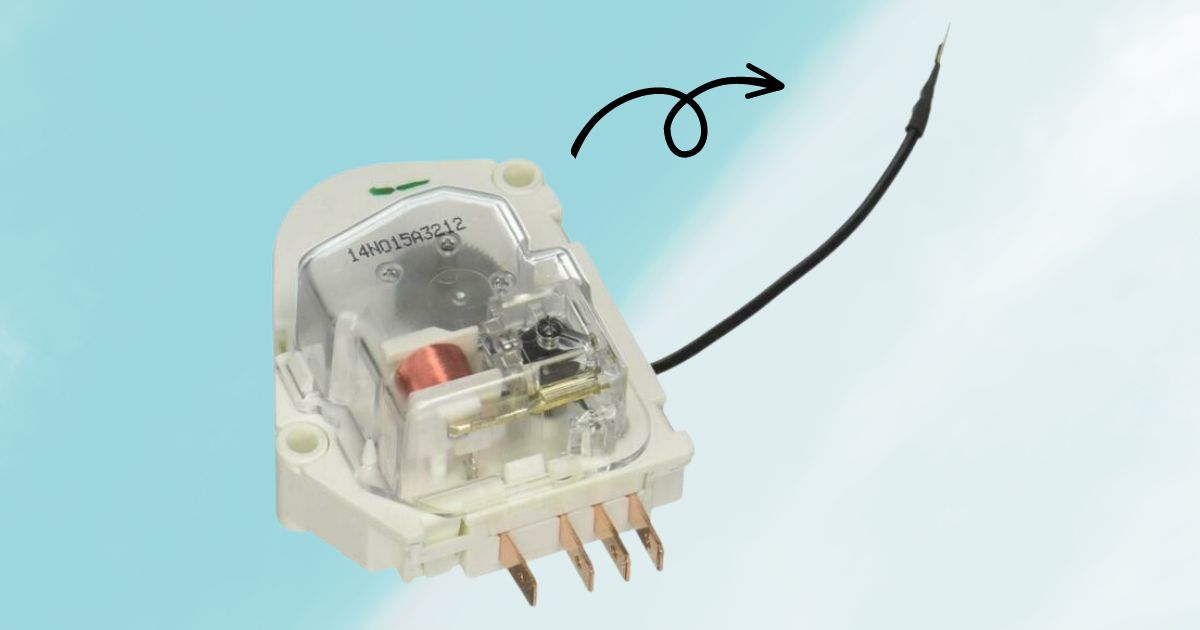
Defrost Timer Black Wire:
The black wire on a defrost timer is usually the power supply. The voltage that should be supplied to it depends on the type of timer being used, but typically it needs between 24 and 120 volts AC or DC. The current requirements for this wire can range from 0.2 amps up to 10 amps depending on your system’s specific requirements.
What is a Defrost Timer?
A defrost timer is a device that cycles the refrigerator’s compressor on and off. It regulates when the fridge should go into its defrost cycle, which prevents ice buildup in the freezer.
This helps maintain maximum efficiency in both cooling and energy consumption.
The black wire of a defrost timer typically connects to one of two sources; either directly to an AC outlet or to a control board within the refrigerator.
When connected to an AC outlet, it will allow for manual operation – meaning you can turn on/off your refrigerator manually with ease.
When connected to a control board inside your fridge, it will enable automatic operation – allowing you to set specific times for when your unit should enter its defrost cycle.
In addition to helping maintain efficient cooling and energy consumption, having a working defrost timer is also important for keeping food safe from potential spoilage due to excessive frost build-up in the freezer compartment over time.
The regular cycling of heat during its assigned intervals also helps reduce noise produced by any components which may result from excessive vibration caused by icy buildups in freezer compartments over long periods without maintenance or cleaning out old frosty items no longer needing refrigeration storage space.
Black Wire of Defrost Timer:
The black wire of the defrost timer is an important part of a working refrigerator system. It connects to the terminal #2 of the compressor, and helps regulate when the refrigerator is in cooling mode or defrosting mode.
The timer works by sending electrical pulses to turn on or off either one or both sets of coils depending on whether it’s cooling or defrosting.
When functioning properly, this wire will help maintain a consistent temperature within your fridge, ensuring all food stored inside remains fresh and safe for consumption.
It’s essential that this black wire be installed correctly with no exposed wiring as any kind of fault could have serious consequences for both you and your appliance: short circuits are known to cause fires due to intense heat build-up around faulty connections.
As such, if you ever need to replace a component connected to this black wire – like the thermostat – make sure it’s done by a qualified technician who has experience working with refrigerators.
Ultimately, while it might seem like an insignificant detail compared to other parts within your fridge, proper installation and maintenance of the black wire can go a long way towards keeping your family safe as well as making sure everything stays cold and frosty!
Functions of the Black Wire:
The black wire in a defrost timer is responsible for controlling the defrost cycle. It is connected to the evaporator fan motor and sends voltage to it when the time comes to activate the defrost mode.
The black wire also functions as a ground connection between components, ensuring proper electrical grounding throughout the system.
Accurate timing:
The purpose of this wire is to provide accurate timing for the start and end of each defrost cycle.
This type of precise control helps keep temperatures consistent within the refrigerated space, promoting efficient operation and avoiding potential ice build-up on food items or other components from improper running conditions.
Safety feature:
In addition, this wired connection serves as an important safety feature because it prevents any accidental energizing or starting up without providing enough time for cooling down periods that are necessary in order to prevent damage from occurring due to excessive heat buildup.
With all these features combined, one can see why having this specific black wire in a Defrost Timer can help ensure continuous safe operation of your refrigerator unit!
Troubleshooting Problems with the Black Wire:
Troubleshooting problems with the black wire of a defrost timer can be tricky. It is important to take the necessary precautions and inspect all components before proceeding.
If a problem arises, it is best to disconnect power from the unit prior to attempting any repairs or troubleshooting.
Checking for proper installation:
The first step in troubleshooting an issue with the black wire of a defrost timer should always include checking for proper installation and connections between all parts involved, including terminals, capacitors, resistors and wires.
Additionally, it is important to make sure that none of these components are corroded or damaged in any way before connecting them again.
Using a voltmeter on each connection point:
Once this step has been completed successfully, then further investigation may be needed by using a voltmeter on each connection point within the system: terminal block connectors, condenser fan motor windings etc.
As well as testing for continuity along each section of wiring connected directly into your defrost timer’s black wire circuit board.
This will help identify where exactly current flow is being interrupted due to faulty wiring or components – allowing you to make necessary adjustments accordingly.
Internally issue :
Finally, if no fault can be found upon completion of these steps then it could indicate that there was an issue internally within your defrost timer itself which needs replacing entirely – requiring professional assistance if need be.
Replacing a Bad Black Wire:
Replacing a bad black wire is an important part of maintaining the proper functioning of your defrost timer.
The black wire is responsible for providing power to the timer, making sure that it can keep time properly and accurately perform its function. If left unchecked, a faulty or malfunctioning black wire can cause the defrost cycle to be interrupted or even fail altogether.
The first step in replacing a bad black wire is to identify where it’s located within your system.
This should be relatively easy as you’ll be dealing with only two wires: one going directly from the power source and another leading away from it towards the timer itself.
Once identified, disconnect this second lead at both ends and remove any wiring clips holding them together if necessary before proceeding further.
Next, obtain a replacement black wire that meets all relevant specifications (such as gauge thickness).
Then cut off any excess length at either end so that there are no loose strands sticking out which could potentially create shorts while re-wiring everything together – taking care not to nick or damage insulation in doing so!
Finally install new clamps (if required) on either side of connection points; followed by connecting up all wires securely according to their designated colours – ensuring no wrong connections have been made in process by double checking beforehand!
After which run through final tests ensuring that all works correctly before powering back on once again.
Tips for Installing New Black Wires:
When installing a new black wire for a defrost timer, it is important to take safety precautions and follow instructions closely. To ensure the installation process goes smoothly, here are some tips to follow:
Turn off the power from the circuit breaker:
First, make sure you turn off the power from the circuit breaker before beginning any work. This will help prevent electric shock or damage to both yourself and your equipment.
It is also important that you use the correct gauge of wire when connecting your new black wire. Check with an expert if unsure what size would be best for your particular application.
Attach one end of the black wire onto a terminal screw:
Next, attach one end of the black wire onto a terminal screw on the appliance side of the timer box, then connect its other end into a ground hole in another part of the circuit which may include an outlet or switch box.
Connections are secure:
Be sure all connections are secure by tightening them with pliers and covering them with electrical tape when finished.
Restore power:
Finally, restore power by turning back on your main breaker and testing out your work by ensuring all appropriate functions are working properly before moving onto another task.
This includes checking for shorts or improper wiring connection issues as well as verifying proper operation once again after completing everything else involved in rewiring any device connected to this same system (such as light switches).
Common Questions about Defrost Timers and Their Connected Wires
Defrost timers are devices that control the defrost cycle of a refrigerator.
They regulate when and how often the compressor should stop running in order to allow frost and ice buildup on evaporator coils to be melted by heat generated from other components of the appliance.
Defrost timers usually have several connected wires, each serving different purposes.
Common questions about these wires include what they do, where they go, and how they work together with the timer.
The black wire is typically connected directly to one side of a transformer located inside the cabinet or near an electrical outlet box; this provides power for both controlling functions and powering relays within defrost timers.
The other side of the transformer is generally grounded or wired through another circuit for safety reasons and increased efficiency.
In some cases, there may also be multiple black wires connected between components such as a thermostat or temperature control switch which helps determine when it’s time to start up again after defrosting has finished.
When working with any type of wiring related to refrigerators or freezers, it’s essential that safety precautions are taken at all times (such as turning off electricity before working).
Additionally always consult an experienced service technician if uncertain about anything relating to wiring connections associated with your specific model/brand refrigerator/freezer unit before attempting any repairs on your own.
Where does the black wire go on a defrost timer?
The black wire on a defrost timer is connected to the terminal #2. It is used to power the timer and other components of the system, including any fans or coils.
The connection should be made to an appropriate source that provides enough voltage for the system’s needs.
When installing a new defrost timer, it is important to identify where the black wire should go before beginning work.
Generally speaking, there will be two connections available – one for AC power and one for DC power – so it is important to make sure you connect the right type of wire in each location. This can help avoid potential problems down the line when using your equipment.
It is also essential that you check your wiring diagram carefully before connecting any wires and double-check that all connections are secure once everything has been set up correctly.
Always follow safety guidelines when working with electricity as incorrect installation can lead to serious damage or even injury if not done properly.
Conclusion
Understanding your refrigerator’s defrost system is critical to the proper operation of your appliance. This includes knowing when and how the defrost cycle occurs, as well as what part the black wire plays in it.
The black wire connects to a timer that controls when a defrost cycle begins and ends. By providing an interrupt signal, this timer turns on power to initiate the process of melting any built-up frost or ice inside the freezer compartment.
It then releases heat into the unit until all ice has melted and returned it to its normal operating temperature.
To ensure optimal performance, it’s important for homeowners to regularly check their refrigerator’s defrost system and replace components such as timers if needed. With regular maintenance, you can keep your fridge running efficiently for years to come!
FAQs
Q1. How does the black wire affect the defrost cycle’s timing accuracy?
The black wire is integral to the defrost timer’s function, providing the necessary power for accurate timing of the defrost cycle. A faulty black wire can lead to incorrect timing signals being sent, causing either insufficient defrosting or excessive energy consumption. Accurate timing ensures the refrigerator remains efficient and extends the life of its components by preventing ice buildup.
Q2. Can a damaged black wire impact the refrigerator’s temperature consistency?
Yes, a damaged or improperly connected black wire can severely impact the refrigerator’s ability to maintain consistent temperatures. Since it controls the defrost cycle, any malfunction can result in irregular cooling periods, leading to fluctuations in the internal temperature that can compromise food safety and increase energy usage.
Q3. What precautions should I take when replacing the black wire in my defrost timer?
When replacing the black wire, always disconnect the refrigerator from the power source to avoid electric shock. Use a wire of the correct gauge and type as recommended by the manufacturer. Ensure that all connections are secure and insulated to prevent short circuits. Consider consulting a professional if you’re unsure about the process to avoid further damage to your refrigerator.
Q4. Why is grounding important for the black wire connection in a defrost timer?
Grounding the black wire connection is crucial for safety, preventing electric shock by offering a path for excess electricity to flow back to the ground in case of a short circuit. It also ensures the stable operation of the defrost timer by minimizing potential electrical interferences that could disrupt its performance.
Q5. How can I tell if the black wire is the cause of my refrigerator’s defrosting issues?
If your refrigerator has defrosting issues, check the black wire for signs of damage, loose connections, or corrosion. Using a voltmeter, verify if it’s receiving and delivering the correct voltage. If discrepancies are found or if the wire appears damaged, it’s likely the culprit and should be replaced.
Q6. What should I do if my refrigerator’s defrost timer doesn’t have a clearly labeled black wire?
If the defrost timer’s black wire isn’t clearly labeled, consult the refrigerator’s wiring diagram or manual for guidance. Manufacturers typically provide detailed diagrams showing wire colors and their connections. If still unsure, seek professional assistance to avoid mistakenly tampering with the wrong wires, which could lead to more significant issues.